This post may contain affiliate links. Please see our full Disclosure Policy for details.
This acrylic pour art technique involves pouring acrylic paints in a wooden bowl to make a beautiful swirl pattern without dripping paint mess for beginners. Add gold leaf details and epoxy resin to seal the beautiful results.
Let’s decorate a wooden bowl with acrylic pour and gilding! This is a beautiful technique that you can use to make endless combinations and designs to decorate almost any surface! You can make projects like acrylic pour wooden bowls, trays, plates, tables, and so much more by filling a hollow surface. You will love these acrylic pour painting ideas if you are interested in making wall art.
We will need liquid dishwashing detergent, white/school glue, plain water and acrylic paints! For professional results and recommendations based on this experiment continue reading!
How to make acrylic pour art in a bowl?
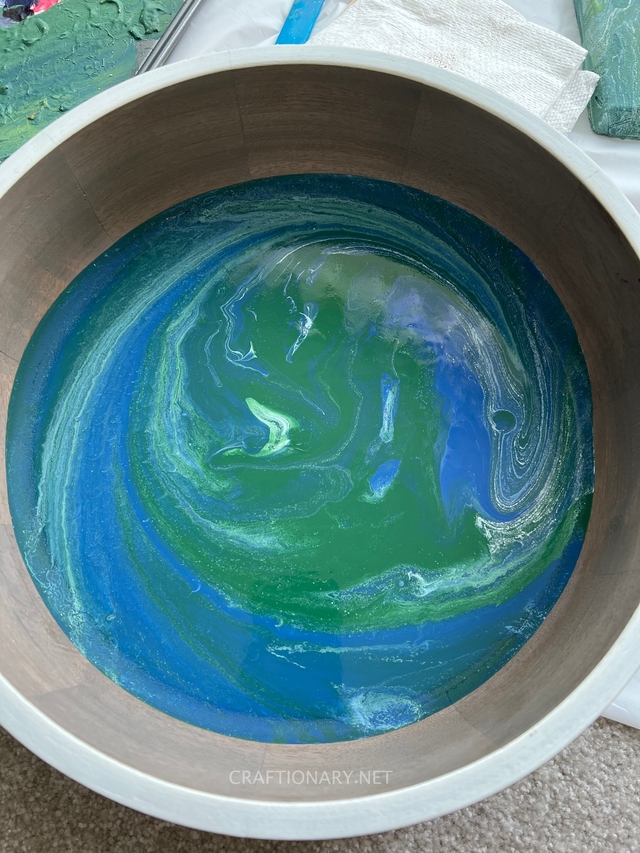
The inspiration for this project comes from the aerial view of the Earth! Therefore, we will need green, blue and white acrylic paints to achieve this look! Check out the video to make acrylic pouring instructions easier to comprehend:
Material:
- Acrylic paints in your choice of colors – you can mix as many shades of paint as you like but for start two tones works best. Always use white or black for contrast to make fun patterns visible.
- Elmer’s white glue or any school glue
- Liquid dishwashing detergent
- Water
- Disposable cups
- Craft stir sticks or silicone spatula for mixing
- Wooden bowl or any surface you wish to pour paint inside
- Gold leaf sheets
- Tacky Glue
- Epoxy Resin – check out epoxy resin crafts for more details.

Instructions:
How to mix acrylic pour paint?
Mix equal parts of Elmer’s white glue and acrylic paint in two separate cups (1:2 floetrol and acrylic paint as suggested by Flood brand)! You can experiment with different quantities if you like. Shake the paints well before pouring them into the cups! Make sure to use a silicone stick and move your stick around the surfaces and base of the cup to mix the two thoroughly!
Depending on the thickness of the paint add water to the solution to make it runny enough that it can flow easily but not watery! Add a few drops of liquid detergent to allow patterns to form naturally! This method is for first-timers who want to try acrylic pour without spending on specialty materials!
Substitute for pour medium:
There are other more refined materials you can use for professional results like Floetrol instead of white glue. The suggested ratio is 1-ounce floetrol to 1/2 ounce acrylic paint to get vibrant swirls and cells like Kathryn Beals.

How to make cells in acrylic pour?
Cells are formed when paints have varying densities. There are many ways to create cells in acrylic pouring like using floetrol and liquid detergent that are used in this article. You can use silicone oil, blowing the paint with a blow dryer, or torch to form cells and stop colors from mixing for best results.
How much acrylic paint quantity do I need for my project?
It is also important to keep in mind the quantity of paint you need for the surface area of a pour! A simple rule is to use water to fill your bowl and use it as a measurement for your pour! Divide it into three colors for this project for instance!
According to Paint Pour Academy, a good rule of thumb is to approximately use 1 ounce of paint for 25 square inches of surface area.
How many colors to mix for acrylic pour art?
There is no set rule for the number of colors you can combine for an acrylic pour. Try different shades that match or contrast while using neutrals to make shade variations and fun patterns attractive. Check out fun acrylic pour techniques to try some of them.
How to create acrylic pour in a cup?
Now that our paints are ready it is time to create a pour! We will use white to give contrast to our paints! Take an empty disposable glass and add small quantities of each color substituting between the two colors, while adding white between each layer! Continue adding small amounts till you use it all!
Have your bowl ready, make sure it is clean and dust-free before you start! Now put the bowl upside down on the glass with paints! And apply firm pressure to avoid any space between the two surfaces flip the bowl and cup such that the cup is on top of the bowl! Wait for a while to allow the paints to settle in a downward direction!
Now for the fun part! Flip the cup and remove it! Start moving the bowl around to allow the colors to flow and cover the entire surface or just let it flow naturally! Whatever you do just know that every movement will move the paints and give a pattern! Just move around enough till you are satisfied with the results! You can also use a wooden skewer stick to make spirals and designs that will allow the paints to swirl and make patterns as well! Experiment and have fun!
Now allow it to dry for a day! The glue in the paint helps with the paint flow and makes fun of cracked valleys and islands!
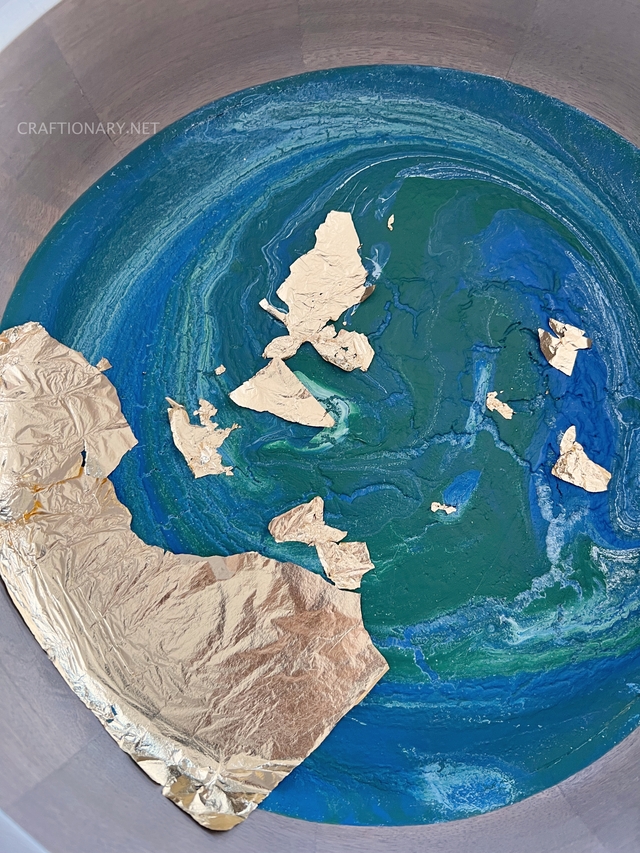
Gold leaf sheet gilding on acrylic pour
How to apply gold leaf to acrylic painting?
Wondering if you can apply gold leaf directly on to acrylic paint? The answer is yes you can do gilding on acrylic pour.
Here again for the purpose of this beginners project we are using tacky glue and gold leaf sheets! For ideal gilding results use pebeo gedeo kit that comes with gilding paste pen and mirror effect gold leaf.
I recommend watching this beautiful art by Mii Paintings that I want to try with golden foil as a substitute for gold leaf sheets which are very delicate to handle.
Can you use Elmer’s glue for gold leaf?
You can use Elmer’s glue but it is very runny and hard to control. A better substitute is tacky glue which is thicker and less watery.
Use a paint brush to carefully draw your pattern of choice with little tacky glue! You can also use a pencil to draw your pattern before applying glue! The purpose is to make the pattern such that when you place gold leaf sheet on top it doesn’t splat between the two surfaces! Once you have applied the pattern with the glue, place the gold leaf sheet on top and smoothly brush it to stick to the glue.
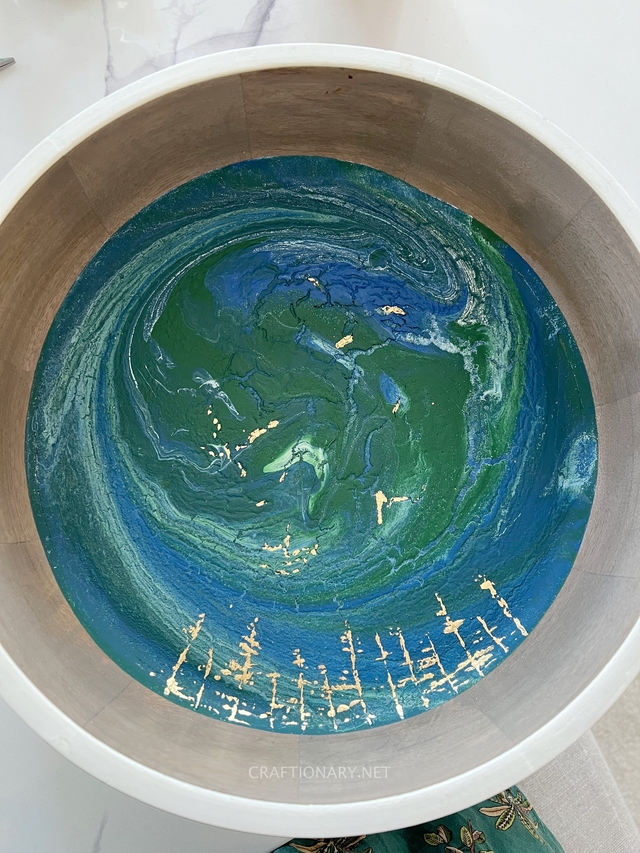
How long to dry glue before removing gold leaf sheets?
Allow it to set for 15-20 mins! Now use a dry paint brush to brush off the gold leaf sheet to reveal the motif! Be gentle when removing the gold leaf sheet! Keep the leftovers in a jar for future projects! I also gave gold leaf details where deep pools are formed! You will also love gold leaf application on laser engraved canvas.
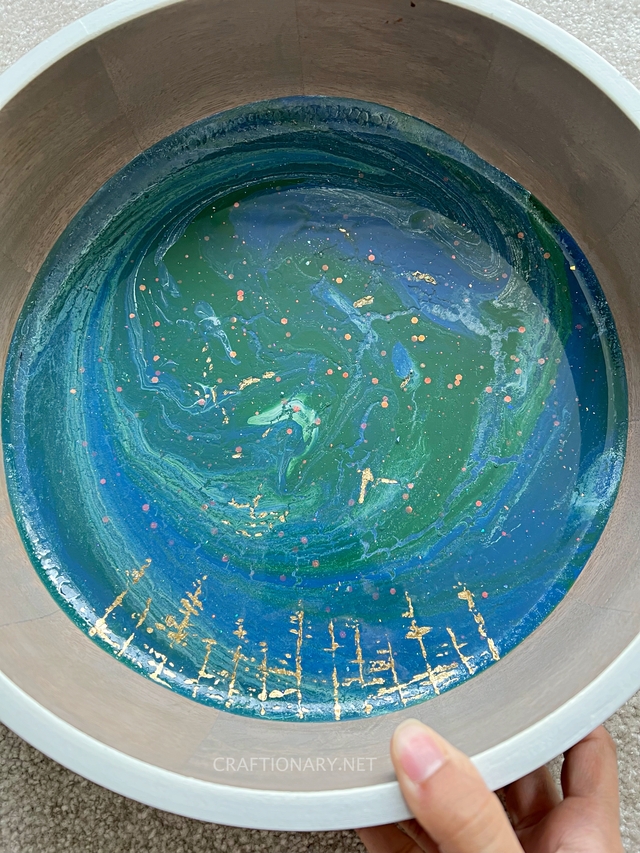
Sealing acrylic pour art with resin
Epoxy resin not only gives a shiny beautiful layer on top of your acrylic pour art but also seals it to prevent any damage to the art and makes the project usable and washable. There are epoxy resin solutions available in the market now that are safe to use for putting edible food as well.
Does epoxy resin stick to gold leaf?
Yes, epoxy resin can be used to layer gold leaf without any curing issues.
Now mix epoxy resin as per manufacturer’s guidelines and pour on the top to seal and give that beautiful shiny look! If you are new to epoxy resin you will benefit from instructions to mix and pour resin. I added chunky glitter to the resin just for fun! Let it cure for 24 hours! Your beautiful wooden bowl is ready to use for decor or serve!
I hope you enjoyed this tutorial!